

Especially important is the right color combination for your character’s skin tone since it’s the most recognizable part of your character illustration.

Hi! I’m Tina aka jonajpeg and I’m a freelance artist based in Germany. I love to draw manga/anime inspired characters and teach how to draw and color with markers on my Instagram & YouTube Channel.
That’s why I’d love to demonstrate to you my color-choosing and coloring process for different skin tones with the following Step-by-Step blog post. You’ll get a detailed instruction on how to color different skin tones using the new Oahu 36 Skin Tone Colors Set.
But before we dive into each step, let’s take a look at the art supplies I’m using:
- A printout of my illustration on Ohuhu Marker Pad (19,3 x 25,4cm)
- Ohuhu Alcohol-Based Markers (Oahu 36 Skin Tone Colors Set)
- Optional: Wax-based colored pencils or Ohuhu Fine Line Drawing Pens

Now we’re prepared with all art supplies laid aside and are good to go. Let’s start with the first step of today’s coloring guide:
1.Preparation – before you start coloring
1.1 Swatch all your markers
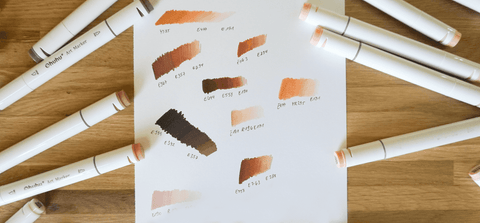
By ‘swatching’ I mean, that you should test your markers on a seperate sheet of paper – best on the sort of paper you’re going to use for coloring your illustration. Keep that color chart handy for a better overview of all your markers you already own and a much faster way to pick your colors.
Here you can see the color swatch I’ve done for today’s illustration. All colors are included in the new Oahu 36 Skin Tone Colors Set and the ones marked with a * are exclusive colors, which can not be found in any other set of Ohuhu Markers.

Actually there are some more benefits of owning a Color Swatch:
- You’ll be able to pick the right color by the actual color of the ink, not by guessing with the color of the caps (which can be VERY different)!
- Since the color of alcohol ink always changes when it’s dried, you can be sure to have the right color pick in the end
With every set of alcohol based markers Ohuhu provides individual color swatch cards! So do yourself a favor and swatch your markers 😉
1.2 Choose colors for base skin tone, light & shadow
If you only take one shadow tone beside your base skin tone your character will look flat and almost formless. To create a better contrast and a more realistic look I recommend picking three to six different colors for one skin tone.

That includes one base and one highlight tone, two to three darker colors for shadows and sometimes an additional color for cheeks and lips helps to bring more depth and life to your character’s face.
If you do not have the color variety of the 36 Skin Tone Colors Set, you’ll probably struggle a lot to pick that many colors. A great alternative are colored pencils, with which you can compensate for the lack of color variety. I love to use wax-based colored pencils, since they’re smooth as butter and easy to blend.
As shown in the picture above, I’ve tried a lot of color combos until I’ve picked the final ones, which you can find listed in each of the following steps.
After picking the base color I’ve tried to find a highlight color which matches E367 in its color composition and is brighter and/or desaturated. E367 is a rich, warm brown tone, almost like chestnuts. So now we have to look for a cooler/more grayish brown, which is also much brighter. So I’ve looked for some matching markers on my color swatch and picked a few, which could fit. Then I tried to blend E367 with the chosen markers and ended up with E190.

While I tested them on the paper, I’ve recognized that the transition of both colors is not that smooth as I wanted it to be, so I’ve decided to search for another marker, which lies in between. E294 was my first pick and it fits very well.

Okay great, now we have our base color, and two highlight colors. Let’s search for a shadow tone. Complying with my first tip I’m looking for a cooler/more desaturated color as E367 (base color). The marker E258 immediately catched my eye, since it almost looks purple/violet, which fits perfectly to black skin. After a test blend it was clear: E258 is the winner.
Fun Fact: After I’ve chosen these colors, I stopped looking for more and decided to start the coloring process. During that I’ve recognized that something is missing.

That’s why I decided to take another color for her cheeks and lips. Since our base color is a rich, warm brown, I’ve picked an orangey/ochre marker, which is also a warm tone.
You could also give her more reddish/purple cheeks and lips. In this case her skin would look much cooler. Since I wanted to color her jewelry orange/ochre, I decided to rather pick the orange to create a more cohesive look.
You see, picking skin tone colors has nothing to do with a secret formula or a color picking gene in your DNA. It’s more a process of trial and error until you find what you really like.
2.Coloring Process: Step by step
With alcohol markers I recommend to always start with the lightest parts of your drawing, since lighter ink tends to pick up the darker ink, which can ruin your coloring. In my case it’s the boy in the middle and the girl on the right side.

Before we start it’s important to determine where each color has to be laid down. More Precisely: Where are the lighter parts of the face and where are the darker ones?
It’s undeniable that the individual light situation plays a huge role in this thinking process. BUT that would be beyond the scope of this blog post. So let’s stay with a basic light scenario for this guide here.
In these pictures I’ve marked the shadow and highlight areas as a guideline for you, the rest will be your base skin color. Let’s keep that in mind while coloring each face.
But what should we do, if we’re supposed to color hands, fingers or arms? Well, my tip here is keep things simple. Imagine every part of the body as a simple basic shape.

Another tip is: Consider if something is in front of the face/body and is shadowing. For example hair or clothes shadowing on skin.

Following this tip will lead to more depth in your illustration.
2.1 Light Skin Tone (Blender, R196, R195, R192)
Then I moved on to his neck and collarbone to repeat the same procedure.

Okay, now we’re done with the first layer. Let’s grab the next marker, which is R195. I applied the shadow tone on his eyelids, under his nose, lip and chin and then blended with the base color R196 to smooth the transition.
For even darker shadows you could repeat that step until you’re satisfied. Since I wanted to use colored pencils in the end, I left it like this.

I thought it would look cute to have him some freckles. So I took R192 to place the freckles, then soften the dots with the blender.

2.2 Light Skin Tone (Blender, E191, R196, E294)
Moving on to the girl on the right. Here I took E191 as a base color and also the blender. According to chapter 2.1 I started with her face, left space for the highlights, softed transitions with the blender and moved on to her upper arm until I finished setting the first layer.

Then I started with the shadow color R196 and darkened some shadow areas with E294. I always soften the transitions with the marker I used for the previous step. So while I worked with R196, I’ve used E191 for blending and while using E294, I’ve used E196.

Now moving on to the boy on the left with a medium dark skin tone. I took E294 as his base skin color and E494 as the highlight tone. During the coloring process I recognized that the blending was not turning out as good as on my test sheet. So I needed another color to create a soft transition. So I tried R195. I found that R195 added warmth to his face while also connecting E294 & E494, which I very liked. So I just layed down a whole layer of this color on top of the first one.

Since I had more color options with this skin tone, I took two shadow tones: E367 as the darkest shadow tone and E477 as the lighter one.
After that I darkened the harsh shadow areas under some strains of hair, since here the hair is shadowing on his skin.

2.4 Dark Skin Tone (E190, E294, E367, E258, E679)
After applying E367 as the base skin color I filled the white areas with E190. As I mentioned in the beginning, I recognized that an additional color would help to soften the transition between E367 and E190. So I took E294 for blending.

After applying the shadow tone E258 I took the base color again to blend the transition. The last step here was adding a blush tone to her cheeks and lips to bring more life to her face.

2.5 Coloring the rest of the illustration with markers
With all other components colored, such as clothes, hairs and eyes, I think we’ve done a good job with our coloring so far.

Now we have three options:
Like with the markers I searched for colors that matched each skin tone and repeated each step I explained in the previous chapters. I softened the transitions and darkened some shadow areas.

A real advantage of colored pencils is that you won’t need a huge variety to achieve high color contrasts. With low pressure you’ll get light colors and with high pressure you’ll get darker ones. For the light skin colors I only needed two different pencils.

I also wasn’t that satisfied with the skin color of the boy on the left and the girl in the middle. I wanted their skin to be darker than now. So I decided to darken their skin with colored pencils as well. I’ve also added some lighter parts with a white pencil.

The main reason I love to combine markers with colored pencils is that you can lay down your foundation with the alcohol markers very fast, define your coloration and easily correct mistakes with a handful of colored pencils.
2.7 Enjoy your finished artwork

Are you ready to paint up your inspiration?
With all these tips and instructions I bet, you’re going to have a lot of fun next time you color your character – and hopefully less question marks!


